
Start with the question your video must answer
A viewer sees a closed phone stand, a hand moves, and suddenly the phone is upright. The edit is fast. The explanation is missing.
Useful video editing tips help you decide what the viewer needs to see. For a product demonstration, write one question above your timeline: “Can someone understand how this works after watching once?” Keep the action that answers it. Remove material that delays it. Give the result enough time to register.
This tutorial uses an original animated practice clip of a folding phone stand. You can download the same 24-second source and reproduce a 16-second edit. It demonstrates timing and continuity; the illustrated stand is not a tested product, and the edit has no measured retention or sales result.
Prepare a small, reliable editing workspace
Create four folders: Source, Audio, Project, and Exports. Keep the source untouched and duplicate your timeline before changing it. A file called stand-demo_v02.mp4 is easier to compare with the first export than three files called final.
Before making a cut:
- List the product facts the video must show. Here: the stand unfolds, supports the illustrated phone, and folds away. Real product claims need real footage or other supporting evidence.
- Label shots by action: closed stand, opening, stable result, phone placement, next step.
- Choose the destination framing. For a vertical demonstration, inspect the actual mobile preview before locking captions and graphics.
- Listen to speech before adding music. If a key instruction is unclear in the source, replace the recording or provide a faithful caption.
Any editor with splitting, trimming, captions, and audio-level controls can handle this exercise. Button names vary. The decisions below use source time in seconds, so you can follow them in the editor you already have.
Seven editing decisions that make a demonstration easier to follow
1. Cut the delay before the useful action
An introduction that only announces the video gives the viewer nothing to inspect. In the practice clip, the first four seconds contain a title and spoken introduction. Remove that section and start with the closed stand.
For your own footage, move the playhead to the first frame where the subject is identifiable. Set the new in-point there. Watch the next sentence to confirm you have not cut off a word or necessary context.
2. Remove repeated information
Two nearly identical views of a closed stand rarely explain more than one. Trim a repeated hold when the viewer has already seen the shape and there is no additional instruction.
A useful test: describe each shot in five words. If two neighboring shots have the same description, check whether both earn their time. Keep both only when the second adds a needed angle, detail, or comparison.
3. Preserve the cause of the result
Keep the hinge opening. If you remove that motion, the transition from folded stand to supported phone becomes a small magic trick.
Split around the action, not through the instant that explains it. On a real assembly video, preserve the moment a tab enters a slot or a latch closes. You can shorten the reach toward the product without removing the mechanism.
4. Keep a pause when it helps the viewer inspect something
A pause can be useful. Our edit keeps two seconds after the stand opens. That gives the viewer time to notice the support and ledge before the phone covers them.
Do not treat two seconds as a universal rule. Read a label aloud, inspect the small detail on a phone screen, and adjust the hold to the information. A complicated adjustment may need longer.
5. Make captions explain the action without covering it
Use a short instruction such as “Open the base,” timed to the relevant movement. Put it on a clear part of the frame. Avoid placing it over the hinge simply because that is the center.
Review auto-generated captions word by word, especially numbers, product names, and negatives such as “do not.” If the spoken line says “tighten gently,” a caption saying “tighten firmly” changes the instruction.
6. Protect speech before decorating the soundtrack
Play the edit through an ordinary phone speaker at a comfortable volume. If music competes with a consonant or instruction, lower the music during that line. Recheck transitions for sudden loudness changes.
At an audio cut, listen for a click, chopped breath, or missing syllable. A short fade can soften a click; it cannot restore words you removed. Move the cut when the sentence itself is damaged.
7. End with the next useful decision
After the demonstration, ask the viewer to check something specific: compatible phone dimensions, the mounting surface, or the available size. “Check the fit” is useful when the product page actually supplies those details.
Keep the CTA visible long enough to read. Adding three different instructions at the end makes it harder to know what to do next.
Follow a 24-second source clip into a 16-second edit
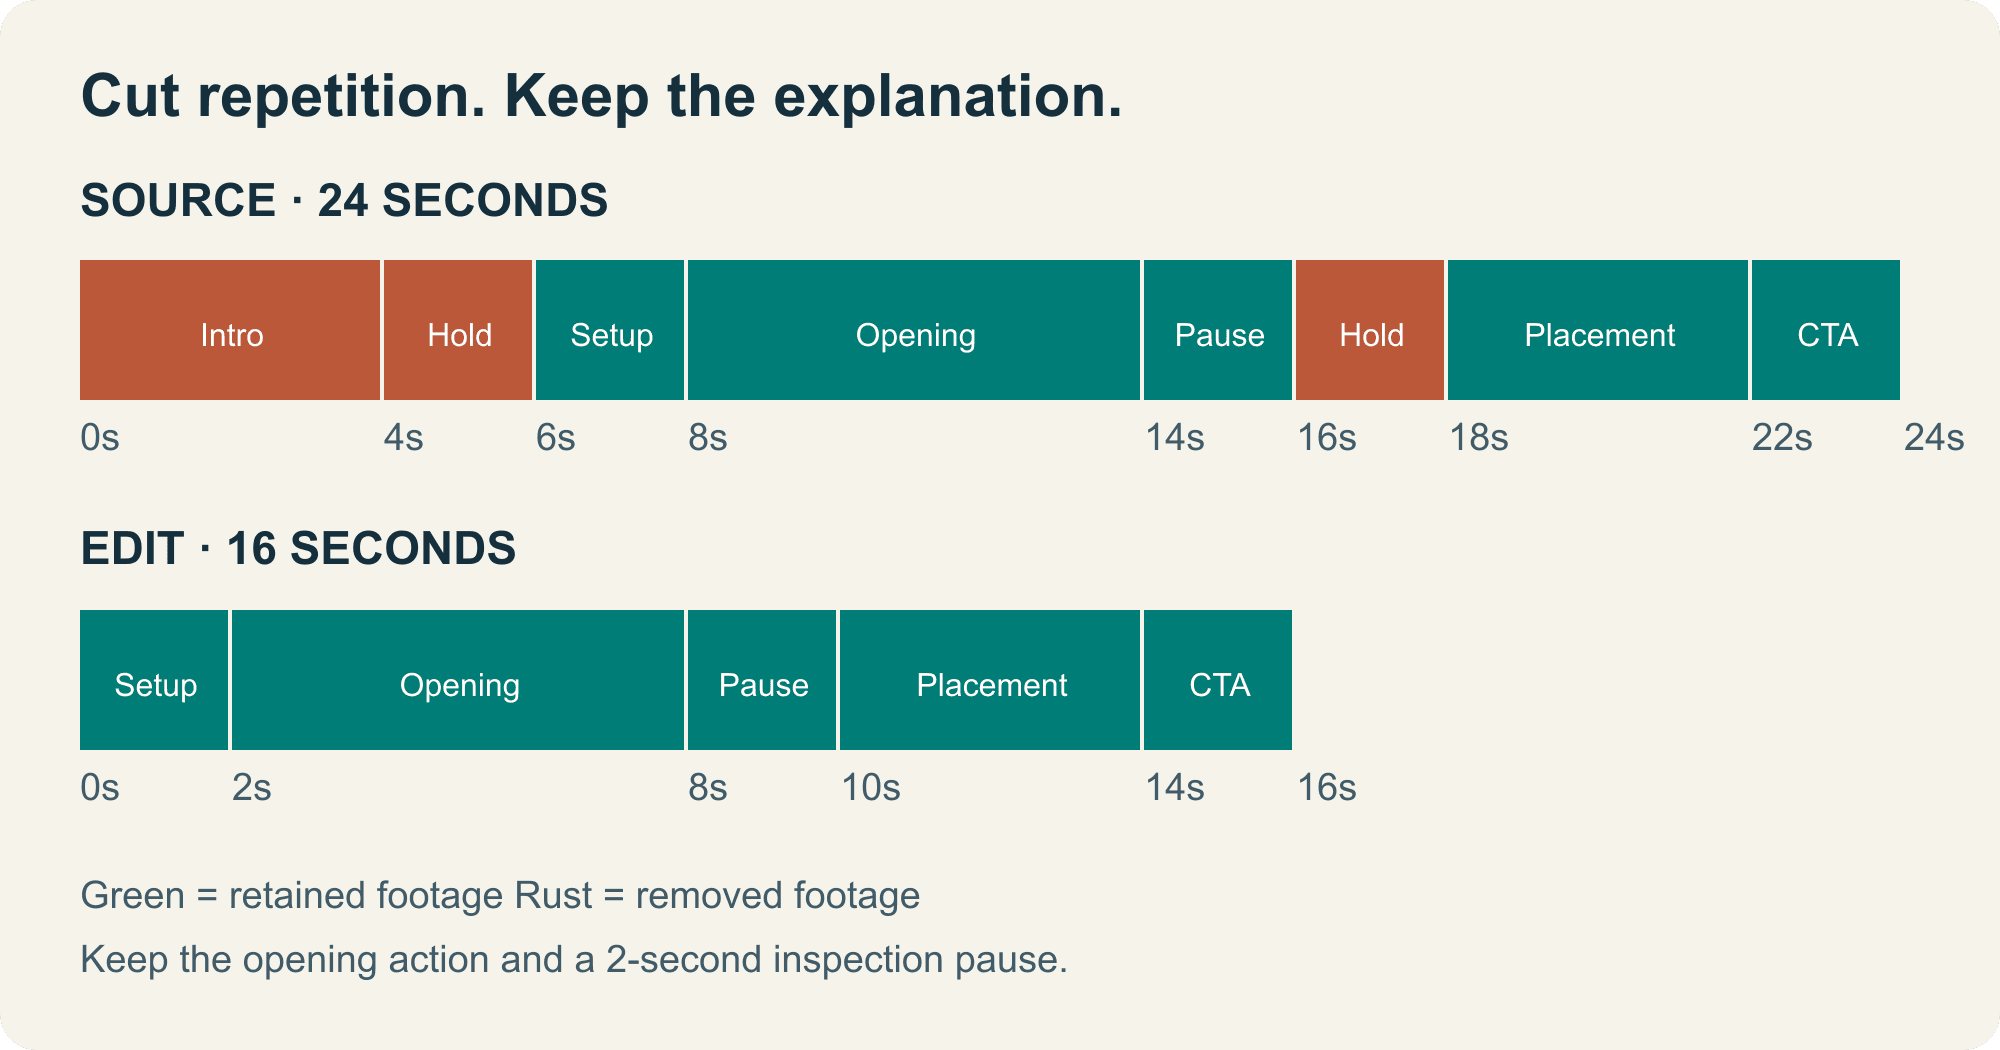
Original practice animation. Colored blocks show editing decisions, not audience-performance data.
| Source time | What appears | Decision | Position in the edit |
|---|---|---|---|
| 00:00–00:04 | Title and introduction | Remove: the title delays the demonstration | Removed |
| 00:04–00:06 | Closed stand, initial hold | Remove: repeated setup | Removed |
| 00:06–00:08 | Closed stand and short instruction | Keep: identifies the object | 00:00–00:02 |
| 00:08–00:14 | Stand opens | Keep: explains the mechanism | 00:02–00:08 |
| 00:14–00:16 | Open stand, no new motion | Keep: useful inspection pause | 00:08–00:10 |
| 00:16–00:18 | Same open stand | Remove: extra hold | Removed |
| 00:18–00:22 | Phone moves onto the ledge | Keep: shows the outcome | 00:10–00:14 |
| 00:22–00:24 | Fit reminder | Keep: next decision | 00:14–00:16 |
The arithmetic is simple: 24 − 4 − 2 − 2 = 16 seconds. In your editor, keep source ranges 00:06–00:16 and 00:18–00:24, then join them. Keep the source frame rate when exporting this exercise so your time comparison stays straightforward.
Watch or download the source clip · Watch the edited clip · Download the edit decision list
The two versions share the same illustrated footage and synthetic narration. The exercise changes selection and timing. It does not add product evidence that the source never contained.
Check the edit with sound on and sound off
Run three passes. These tips for editing video are most useful when each pass has a different job.
Sound on: Listen without looking at the timeline. Can you follow every instruction? Does music or a cut hide a word? The supplied practice clip has narration and no music, making speech cuts easier to hear.
Sound off: Watch at normal playback speed on a phone. Can you identify the object, the opening motion, and the final placement? If not, add a precise label or restore the missing action. A caption should help explain the footage you have.
One-view check: Show the export once to someone unfamiliar with it. Ask, “What moved?”, “What supports the phone?”, and “What would you check before buying?” Write their answers down before explaining your intention. If they miss the support, extend its hold or change the camera angle.
This article provides the assets and the check, not a completed audience-comprehension test. Use the review sheet to record the viewing device, misunderstood detail, and next edit.
Fix the symptom before adding an effect
| Symptom | Likely editing problem | Next action |
|---|---|---|
| The result appears without explanation | An essential action was cut | Restore the hinge, latch, or placement shot |
| The opening feels slow | Repeated setup or spoken preamble | Start closer to the first useful action |
| Text disappears before you finish reading | Too much text for the available hold | Shorten the caption or extend the shot |
| The product changes color between shots | Inconsistent lighting or white balance | Match neutral surfaces; reshoot if accuracy remains poor |
| The voice sounds clipped | Audio cut crosses a word | Move the edit and recheck the whole phrase |
| The video is clear but the claim is unsupported | The footage never demonstrated the claim | Record evidence or narrow the claim |
Start with one repair, export again, and compare the same moment. If you change timing, music, color, captions, and the opening together, you will have trouble explaining which choice helped.
For a complete campaign around the finished clip, use the one-product UGC marketing workflow. If you need to decide what the demonstration should prove, start with product advertisement examples.